Monday, September 29, 2014

Quarter I Project - Fourth Deadline

The fourth deadline I had assigned myself was to have all of the small details finished. Being proactive, I finished this last week. This gave me the time to try to get a running start on my next deadline, texturing. This is technically my fifth deadline, but I remind myself to add some smaller details to the buildings as I go.
Think hard. Almost every major city has a sports team. Baltimore has the Orioles and Ravens, Kansas City has the Chiefs, Sporting and the Royals, Pittsburgh has the Pirates, Penguins, and Steelers, Detroit has the Tigers, Red Wings, Lions and Pistons, etc. Every city promotes their team(s) somehow. I decided to add a sports team into the mix despite not having room enough for a stadium. I began promoting the Cayuga Aces.
That sort of brings me to the name of the city: Cayuga. Cayuga is Shawnee for "starting place." I thought this was fitting because this was my starting point in attempting to make a career out of animating.
Anyway, this was the sign that I designed:

The colors weren't too hard to fit. I just though gold and silver sort of coincided nicely, and it would break from the stereotypical "red and black" color scheme of playing cards.
With Cayuga as the name of the city, every Bus Station needs a sort of introduction and a "welcome." In Photoshop, I made a banner that I later incorporated into a "welcome" sign that I threw on the Bus Station. You'll notice also that the building is textured with a custom brick texture. It's not perfect, but it saves me from distortion. Later, I will bump map everything to give it the realistic grooves. If you can't see the bricks, here's another picture that's just a little zoomed in on another building:
I also just noticed that the only texture on the patios was "Lambert1," the default texture. So to save me from some trouble, I just clicked on the patios and added the texture I added to the Crayola Building. After all, a lot of buildings in the same city are made by the same company who uses the same materials, anyway:
As you can see, it's a bit grainy, which all realistic concrete is.                                 One more major building left untextured was the parking garage, which, actually, is two different buildings. I just created its own texture and put that on all of the walls and sides then took all of the levels (where the cars' wheels would actually be) and applied the street texture from earlier. Once I'd done that, I took the street hashes and duplicated them until I had a few applicable parking spaces. Once that was done, that was the major texturing portion.
One thing that proved to be a challenge was the scenery. When an image was rendered out, there would be black on the outside of the city. I needed something to fill it out. The simplest solution (in my opinion), was to close off the city with a mountain range. Of course, if this were real life, it'd be a terrible idea to build a city in the bowl of a mountain range because of flooding issues. However, this is only an animation for a project. The first part of the project resulted in this:
I needed a way to get into the city, though, for effect. So I added a bit of a "highway" in the outskirts of the inner range. This is shown below. After that, I had to make a tunnel through the mountains instead of lowering them altogether. It seems a little tough at first, but all I had to do was difference the road (made a little thicker) and the mountain. Then all I had to do was take the edges from inside the mountains and connect the vertices on them to make a tunnel.
The little box around the city is where the highway is.
I figured because I actually had enough space, I could actually model a rough sketch of the baseball stadium for the team I'd promoted, the "Aces." When it was all sculpted out and textured, this was the result:

Friday, September 19, 2014

Quarter I Project - Third Deadline

The third deadline I needed to meet was Friday, September 19th. My goal was to have the little things  (i.e. streetlights, stoplights, trash cans etc.) and to have the streets textured. I wasn't sure how at all I was going to go about the street texture for now. Instead, I jumped in with the stoplights.


This is the only stoplight I made. I wasn't going for too much; all I did was create a cylindrical prism, then move the back vertices upwards to give it the slant. After that, I took the Polygon Pipe tool and added it to the rectangle. I scaled the thickness down to almost none. once I did that, I added a sphere and scaled it to fit inside. This would be the actual light. Then I duplicated the sphere and polygon pipe twice more to make the other two lights. I made a metallic shader for the pockets and gave the lights each their own color shader with Blinn.

Designing the actual stoplight was only the beginning. Upon completion of this, I had to smooth out the actual pole the stoplight was to be mounted on. It was rough seeing as none of it was connected. A few connected vertices later, I had a fairly smooth transition from one section to another:
The next thing I had to do was add stoplights to all of the intersections. This didn't take too long; all I had to do for this was to duplicate the stoplight/pole and place it at the different intersections. This was the final result:
Not bad, but something else was missing. The primary goal of this deadline was to have the streets textured. This included the yellow hashes (like the ones in the second picture) and the crosswalks. I initially thought the easiest way to do this was to make a photoshop version and save it as a photo then map it. I spent an entire day making it on Photoshop only to realize this was not the right way. I started from scratch. I made three cubes. From these three cubes, I made everything else on the streets.
The first cube I made was the long white line of the crosswalk. I could easily duplicate that, and did. The second cube I made was the short lines inside of the crosswalk which were then duplicated. With both the long lines and short lines together, I combined them to make them one object. I put those at all of the intersections and grouped them once they were all laid out.
The third cube I made was the yellow hash mark which was duplicated a few hundred times and, like the crosswalks, was grouped. Then I assigned both the crosswalks and hashes their own layers respectively. The final result was this:

Combined with the stoplights, this is what the final result was without the buildings.
I'm still missing a few things: streetlights and other little things like trash cans.
The next assignment I gave myself was to make streetlights. No city is complete without them. To do this, all I did was take the pole from the stoplights and shorten them a bit. After that, I attached a cube to the end of them and messed with the vertices along with the edges and added a sphere to that to be the actual bulb. I didn't put the light sources in them yet because I'm going to save that for the texturing deadline. Once I did that, I followed similar steps as I did with the stoplights: I duplicated over and over and put the streetlights where they seemed fit. At least one per each stretch of road. This was the final result:
Again, it's merely a work in progress. Soon, there will be sources of lights flowing from each one individually, but until then, they make good placeholders.


Another thing you find every so often in every city is a community trash can. The design of these trash cans is fairly simple: it's typically a cylindrical body with a spherical lid with a hole in it. This was very easy to create; all I did to build the trash can was model a cylinder, duplicate it, scale it down, then difference it out. This gave my a cylindrical, hollow body to work with. Once I did that, I modeled a sphere and deleted the bottom half of it. I deleted a few faces to make the opening, selected a few edges, then extruded them to make a believable opening. The picture above is the final result.

After everything had been settled, I met my deadline. The picture below was a rendered picture of my project through the first three deadlines.

Thursday, September 18, 2014

Quarter I Project - Second Deadline

My second deadline was set to be Friday, September 12th. What I had wanted to accomplish was the completion of all buildings. This didn't exactly include texturing, but I figured it'd be worth my time to texture the buildings as I went and adjust as I need to for my actual texturing deadline which is October 6th. However, it'd be silly to save everything until the day before the deadline; the more I do now, the easier it will be on me in the future.

The first thing I did was apply the easiest textures: the brick buildings. I made all of the apartment buildings and basic city complexes (like laundromats and restaurants) to be made of bricks to give it that "classic city" look. Every city in America has those buildings that you can tell have been around for a long while, and this is how a city can display its past and tradition.


You can see that I've also put a transparent texture on the Detroit Marrriott building and the replica of Freedom Tower in New York. This was as a little trickier than I had thought it would be, but all in all, it was quite simple once broken down. All I had to do was duplicate the building and scale it down slightly. Once I'd done this, I gave the duplicate a white texture and scaled it to match the height of the original. The original building was then given a blue/white texture and the opacity was set high, but not all the way. Every glass building can be seen.
Then I decided to continue on with my Triangle Building (below).

It's alright, but I figured the top floor with the pillars could use some glass panels to give it the "ultimate board room" feel. So I started off with an ordinary polygonal cube and started messing with the vertices a bit:
Not very flashy, but it made a good placeholder. I tampered with it a bit more and got it to fit perfectly. Once this was complete, I threw the same glass shader I had used on the Detroit Marriott (GM building) and gave it the finished look.
Voila!
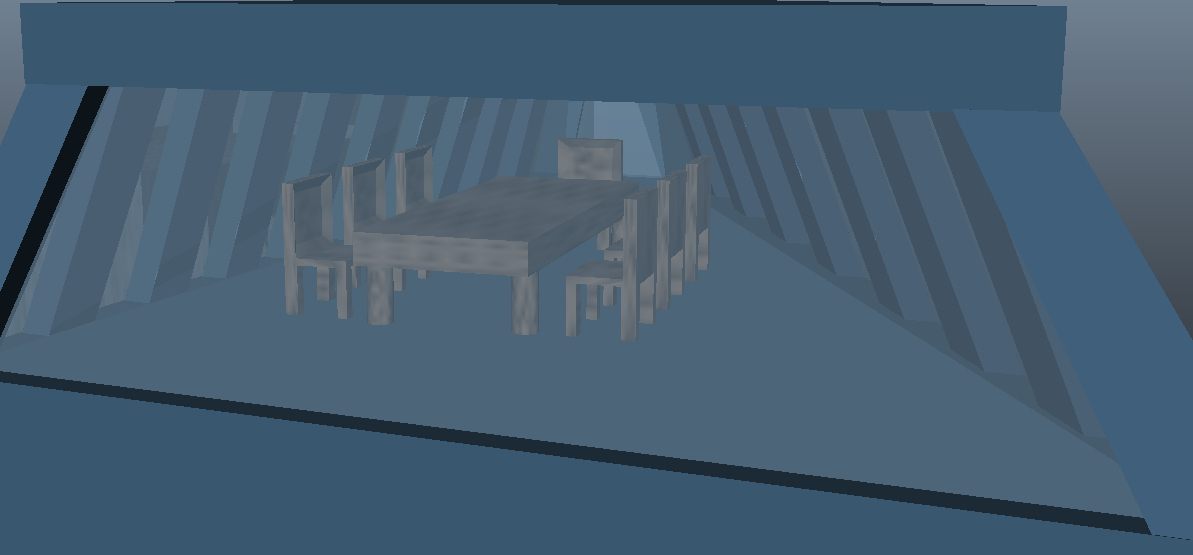
I decided I wasn't finished with it. I wanted to perfect the "board room" idea I had. So I went back in and added a table and a few chairs:


Needless to say, I'm not done with what I had anticipated. I went back today and took a good look at one of my other buildings.
 This building looks a little plain and I wasn't sure how exactly I wanted to go about it. The first thing I chose to do was make the pipe at the top into a smokestack. I had screwed up in an earlier step, so whenever I tried to difference it or take the vertices, it ended up like the picture right there ->.
This obviously wasn't how I had expected it to work at all.


I decided to delete the building and start over. Instead of the tricky cylindrical buildings, I made it a simple rectangular building. Once I had my base, I simply duplicated it, scaled it down, and positioned it above the original. I was set on the smokestacks. I decided the best look for a square-shaped building was dual smokestacks, so I created two cylinders. I then duplicated and scaled down again to boolean>difference them to get the open shape I had hoped for in the beginning. Once I had done that, I took the windows from another building and put them on the factory. The image to the left was the final result. For now, it's only a rough texture, but it sure is a start.

A few things are textured already, but most are only works in progress. Of course, the texturing deadline isn't until October 6th, but again, I don't want it all to fall on me in October. I somehow managed to meet my deadline today to have all of the buildings completely done (save texturing). The final result is this:

 
 My next deadline is September 19th where I plan to have the streets textured and smaller city details like streetlights and trash cans started.

Wednesday, September 3, 2014

Quarter I Project - First Deadline

My first deadline to meet for the quarter project was Friday, August 29th. To make the final due date, I figured I would have to have my city laid out in the most basic of forms.
First off, I needed to start fresh. I didn't want to jump into anything and freehand an entire project, so I took a street layout texture and put it on top of a plane.
After I had this town, I wanted to layout the actual planes that I would use as the roads so I wouldn't have to continually reference the picture above.

Of course, I didn't follow the map completely, but I needed a closed city and I don't want roads going nowhere. It still needs to be cleaned up a bit, but it's a good start.

Once I flattened everything out and lined all the streets up to look nice, I decided I could work on the very basics of all the buildings. It was a little overwhelming, but I felt I needed to start somewhere. Like I previously said, I wanted to model a few buildings after real buildings, so I started with what would be my tallest skyscraper: The Detroit Marriott at the Renaissance Center's main building. Below is a side by side of what I started with in comparison.


Of course, the building I'm modeling is the one in the center on the left. Of course, it needs work, but it's only a start.
After that was done (roughly), I wanted to roughly edit the other buildings to meet my first deadline. So I jumped in with some work:
This is looking like a really good skyline, so I'll throw in the towel as far as skyscrapers are involved. Every city, however, needs a few scenic buildings that aren't skyscrapers. For example, a couple barbecue joints or small HQ offices. Every city has them; it's up to the tourist to spot the best buildings in the city.

I added a few smaller buildings (stuff like bus stops, laundromats etc.) to fill out the city a bit. The below pictures are a couple different angles of my city. You'll notice a few buildings/objects are textured, but this, I assure you, is only because I wanted to distinguish a couple buildings and make sure the lighting was going to work correctly. With a city full of gray, a few objects in color give the eye a break.


Quarter I Project - City Scene

For the first quarter of the new school year, I hit the ground running with a new project. With a lot of ideas floating around my head such as a 2D walking character, an explosion, a 3D walking character, etc., I finally settled down on my newest idea: a city scene.
There's almost no easy way to jump into modeling an entire city. For the first hour or so, I just examined the downtown areas of many major cities including Detroit, Chicago, Kansas City, New York, Denver etc. I just wanted to see what my final image should look like. I decided to take a building or two from many major cities. I had a slight interest in architecture and designing my very own city has also been something I'd've felt I enjoyed.
I have this desire to create, so of course, animation felt fitting. But I also had the idea to create different settings, not just characters. I want to show somebody something that I can be really proud of. However, I also have this dystopian society in mind. I'm basing my project off of Detroit, a city that has been absolutely destroyed the last 40 years, but still coming from my own mind.
Like every good project manager, I needed an outline to follow. So I drew one up:

PRELIMINARY DEADLINE:
August 21st, 2014: 
1) Look at different downtowns and get inspired - 1 Hour.
2) Place a city map on top of a plane to begin - <10 Minutes
3) Start putting streets down onto the map. - 2 Hours.
4) Finishing putting streets down onto the map. - 1 Hour.
5) Start sculpting buildings.
FIRST DEADLINE:
8/29/14
Have all buildings modeled in a rough design. Does not have to be perfect.
SECOND DEADLINE:
9/12/14
Have all buildings completely finished. Try to be as done with this as possible.
THIRD DEADLINE:
9/19/14
Have all streets textured and have some small details started (streetlights/mailboxes/trashcans etc.)
FOURTH DEADLINE:
9/26/14
Have most of the small details laid out and finished.
FIFTH DEADLINE:
10/1/14
Have all small details finished.
RENDER DEADLINE:
10/6/14
Be sure you have everything textured!
FINAL DEADLINE:
10/9/14
End of Quarter. Have project turned in.